- Your doormat gives a first impression right before the door. If you want it to be as individual as you are, you should design your doormat yourself. Either only in the design or also in the implementation. Some manufacturers allow you to have your doormat individually printed – with your own text or even a photo.
- If you want to write or paint your doormat yourself, the best option is to use spray paint or acrylic paint. With doormats, also known as floor mats, it is important not to stick the fibers with the paint.
- Anyone considering embroidering doormats should remember that the waterproof protective layer should not be perforated. In such a case, a doormat with a floor made of small loops is best suited.
Care for the doormat properly
Doormats that are particularly printed should be vacuumed and beaten as a matter of priority. More stubborn dirt can also be washed out with water and detergent. It is best to then let the doormat dry on both sides in a dry, airy place outside.
First, buy one unprinted, plain-colored doormat. You just have to decide whether you want to design a classic coconut mat or a simple dirt trapping mat yourself and what you want to see on the mat.
How about a personalized doormat for them family or as a gift? You can also design your own car floor mats in the same way.
As an alternative to a doormat with a name, a saying or a beautiful motif can also be considered. With most doormats you can even design the shape freely because the fibers are set in plastic or rubber so that they don’t fray.
You can find out how you can design and cut the doormat yourself in the following article on heimwerker.de.
If you are looking for a good dirt trapping mat, take a look at our current comparison of dirt trapping mats.
1. Design your own doormat – ideas for design
Whether as a gift or for your own use: the design should match the entrance and the taste of the residents. Minimalists won’t enjoy a cartoon character with a pithy saying, even if you’ve already laughed at the saying. So take a few days to come to an agreement or create multiple draftsso that you can easily agree on the suitable motif for the doormat.
You can find suitable image motifs on the Internet under the terms Silhouette, template and stencil. Be careful not to use any overly delicate motifs, as they will be difficult to recut 1:1. In the worst case scenario, the corners will quickly fray.
When it comes to text, look for a beautiful font. If you don’t have one on your computer, you can on the Internet under fonts Search for free and test different fonts.
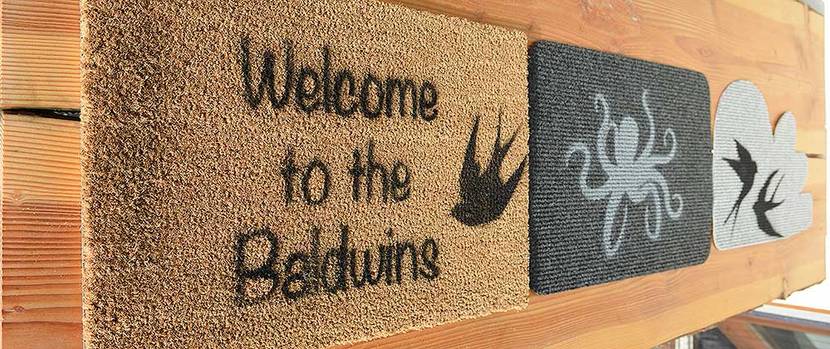
Should your doormat welcome your guests? For example, if you want to give away a personalized doormat for a wedding or housewarming, this is a nice idea in combination with the family name. Or you can personalize it Doormat with all the names of the residentsincluding children’s names and pets’ names.
However, if you are looking for a suitable motto or saying, you should definitely keep in mind that they can only be very short. Choose a font that doesn’t have too thin a line and doesn’t have too small details. You can find suitable and short sayings and quotes on the Internet.
- View doormats on Amazon »
2. Design your own doormat – DIY instructions
| material | Tools |
|---|---|
|
|
2.1. Stencils for the individual doormat

When cutting out, keep breaking the knife to get clean cuts.

Hallmarks are the contents of closed letters (parts) such as e, o, a, b, d, p, g etc.
Create your motif and/or your lettering in DIN A3 format or design several parts in DIN A4 format that you then put together.
For a stable stencil, it is recommended to print on somewhat stronger paper or thin cardboard.
If you don’t have a printer yourself or one with a suitable format, you can also have your individual stencil printed on cardboard at a copy shop.
Take the cutting mat and cutter and carefully cut out the letters or motif.
If a cut goes wrong, simply stick it back together with adhesive tape. Since this is just a template, this error will not be noticeable in the following process.
It is important that you cut out, keep and mark the so-called hallmarks precisely, as they are needed to print on the doormat – this of course also applies to corresponding parts of image motifs.
2.1.1. Have your doormat printed
If you have the doormat printed by a provider, then you are already finished with the design and can have your doormat printed individually.
Pay attention to which format and also which file format the manufacturer of your choice requires. Mostly is one .pdf or .jpg necessary. You can also upload a photo or logo to personalize.
Tip: Some providers allow you to design your doormat online or have access to various images and texts.
2.2. “Print” your own doormat
2.2.1. Spray or acrylic paint?
You can either Colored varnish or acrylic paint to add a saying, name or motif to the doormat – but spraying is easier.
If you decide to use acrylic paints, you should have one Sponge or stippling brush Use to apply the paint and be careful not to let the paint stick together the fibers.
Tip: Make sure there is enough contrast between the color of the doormat and the spray or acrylic paint, otherwise the family name or saying will be lost.
2.2.2. Position and fix the template

When masking, use adhesive tape throughout so that no spray gets through.
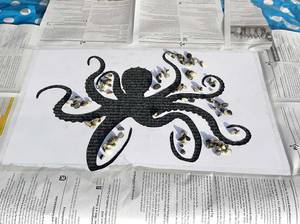
Weigh down any parts that could be pushed upwards by the air pressure.
Measure the distances with a ruler. It is best to stick newspaper paper around the template if the doormat is not completely covered by the template. This in turn is glued also with adhesive film firmly so that the stencil does not slip.
The template can be fixed with pins or pins weigh it down with small stones (only suitable for spraying) so that it is as close as possible to the mat before you spray or apply paint.
- View spray paint on Amazon »
2.2.3. Spray paint
It is best to use acrylic paint spray to design the doormat yourself. The can must before spraying Shake vigorously – a locking ring under the nozzle usually has to be removed before first use.
You should not achieve the necessary application of paint by continuously spraying on one spot, but rather by gradually spraying several layers. This prevents the fibers from sticking together.
This is particularly important if, for example, you want to print on a classic coconut doormat or design your own dirt trapping mat that does not have low loops, but rather a floor. But even with low carpet loops, the paint should not form a crusty layer.

When spraying, maintain the distance (see manufacturer’s instructions) and move back and forth evenly.
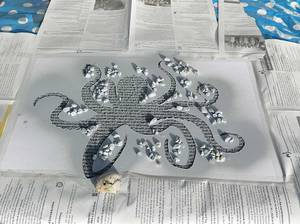
Remove the stencil carefully so that nothing is smeared and no paint-wet stones fall onto the mat.
2.2.4. Small corrections
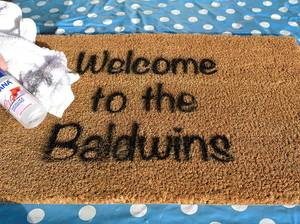
The personal doormat is corrected slightly in some places with nail polish remover.
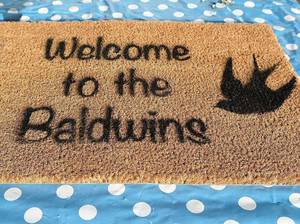
This is what the doormat looks like after a small correction and with an additional image motif.
If some spray mist gets under parts of the stencil in one place or another, this can be done with some nail polish remover and carefully correct it with an old rag.
For example, the “o” on our welcome doormat, the “d” in the interior at Baldwins and the space between “a” and “l” are slightly colored. To do this, place the cloth soaked in nail polish remover around a pen or similar. and correct the places.
2.3. Design your own door mat shape
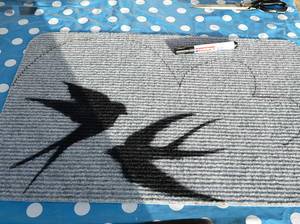
Depending on the possibility, draw the shape at the back or front.
If you need a smaller doormat (e.g. in front of a litter box) or just want a slightly different shape (e.g. car outline), this is easy to do.
Take a felt-tip pen in a clearly visible color and draw the outline onto the mat.
Thin mats can be used with strong tailor’s scissors Cut the thicker ones from the back using a large cutter or utility knife.
When using a cutter or carpet knife, be sure to place a cutting mat underneath or work on a surface that is less sensitive (e.g. lawn).

A small cloud with swallows serves its purpose as a doormat in front of a litter box.

You can easily handle a thin doormat with a pair of large (old) tailor’s scissors.
Tip: Be careful not to fray the edges. With synthetic fiber mats, you can use a candle or a lighter to melt edges that could potentially become critical and thus seal them. But be careful – test it first on a cut off piece over a fireproof surface and ideally outside.
3. More ideas for a very personal doormat
3.1. Paint your own doormat
If you have some talent and/or fun, you can also paint your doormat individually.
To do this, use acrylic paints and dab the color with a stippling brush or a small piece of sponge on; This way the paint application doesn’t get too thick.
3.2. Create a doormat with cutouts
A flat, thin doormat can be used cut out small patterns and use it to create your very own doormat.
3.3. Embroidering a doormat
If you find a flat, small looped floor in terms of material, it can also be embroidered (e.g. with motifs or names) and thus create a very individual doormat yourself.
However, because of its durability, it is better not to use cotton yarn, but rather synthetic yarn.
3.4. Make your own doormats from leftover fabric – two suggestions
- Made from strips of fabric – braid and sew:
To make a whole mat yourself, you can, for example, cut strips of fabric, sew them together into three long strips and braid them into a long braid that is sewn together at the ends. Now simply roll up and sew the individual rounds together from the back. - Tie strips of fabric into a grid:
It’s best to use coarse fabric. For the floor, many strips of fabric of the same thickness and length (approx. 6 to 12 cm long, depending on the fabric and thickness of the fabric). These are now pulled through the fabric once using a large crochet hook or something similar and knotted together at the top. In this way, the canvas is evenly covered with a floor made of strips of fabric strip by strip.
Image credits: all photos VGL/Christiane Baldwin (sorted chronologically or according to the order of the images used in the buying guide)